On this page
What annotations are
An annotation is a shape you draw on an image to point something out — a box around a missing shingle, or an outline around a cracked slab. Each annotation carries three things:
- a name (what it is — for example, "Rust" or "Standing water"),
- an optional description (extra detail you want to remember), and
- a severity from 1 to 10 (how serious it is — 1 is minor, 10 is critical).
Annotations are perfect for inspections: you can walk through a roof, a solar farm, or a construction site, mark every problem you find, and later drop those marked images straight into a report for your client.
Annotating an image (step by step)
You can annotate from two places: an image opened in the Image Viewer, or an image marker on the Map View. The steps are the same either way.
To open an image: in the Files tab, double-click a photo to open it in the Image Viewer. (That viewer only appears once you open an image — if you don't see it yet, that's normal.) Or, on the Map View, click one of the camera markers to open that image (after picking a folder from the Files dropdown).
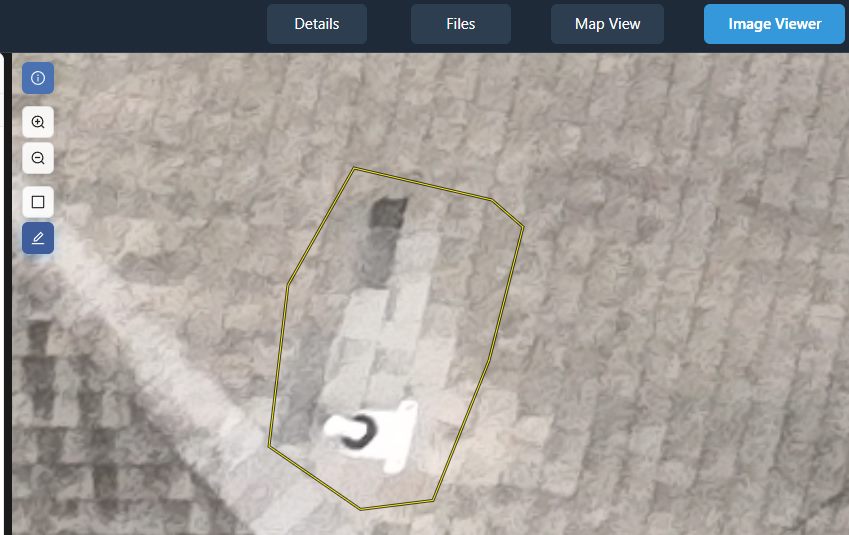
Draw the shape
Choose a drawing tool. On the viewer's toolbar, click Draw rectangle annotation (for a simple box) or Draw polygon annotation (to trace an exact outline).
Draw over what you want to mark. For a rectangle, click and drag a box around the spot. For a polygon, click point by point around the edge of the feature, then close the shape to finish.
Name it (or pick a template)
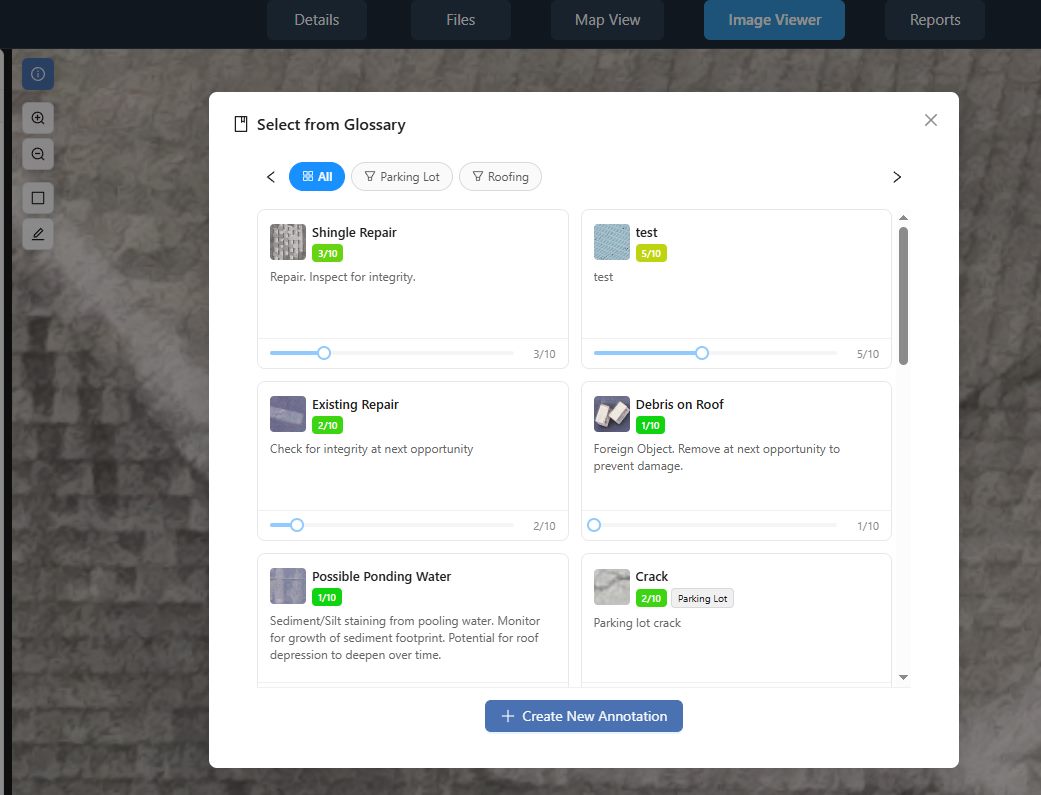
Choose from the glossary, or create a new one. As soon as you finish drawing, the Select from Glossary window opens. Either click a saved template to apply it instantly, or click Create New Annotation to make a fresh one.
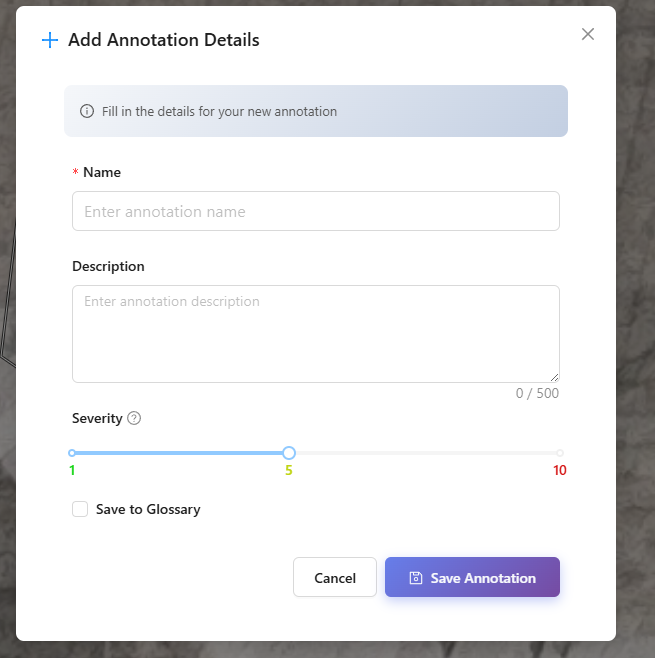
Fill in the details (if creating new). The Add Annotation Details form appears. Enter a Name (required), an optional Description, and set the Severity slider (1 = low / green, up to 10 = high / red). If you'll reuse this label, tick Save to Glossary. Then click Save Annotation.
You'll know it worked when… your shape stays on the image with its name visible, and it's colored according to its severity (green for low, through to red for high).
Tip: Tick Save to Glossary the first time you mark a common issue. After that, the same label is one click away on every future image — so your reports stay consistent and you save a lot of typing.
The annotation glossary
Your glossary is a personal library of reusable annotation templates — each one a saved name plus a default severity. It exists so you tag the same kinds of issues the same way every time, instead of re-typing "Cracked tile — severity 7" on photo after photo.
It builds itself as you work. Every time you tick Save to Glossary while creating an annotation, that template joins your library.
Open it any time. You can reach your full glossary from the Annotation Glossary item in the sidebar, as well as from the Select from Glossary window that pops up while annotating.
Recently used items rise to the top. The templates you've used most recently float to the top of the list, so the labels you reach for most are always right there.
Note: The glossary is yours — it follows your account across all of your jobs, so a template you save on one project is ready to use on the next.
Where annotations show up
Once saved, an annotation appears in three places, so your work is easy to find and to share:
- On the image itself — the shape stays drawn on that photo whenever you open it.
- On the map — that image's camera marker on the Map View turns yellow, so you can spot at a glance which photos have notes on them.
- In a report — you can include annotated images in a client report, with your marks and labels intact.
- In the point cloud — our new annotation-projection feature displays your annotations on the point cloud, giving stakeholders a clearer view of where each issue sits in the real world.
You'll know it worked when… the image's marker on the Map View shows up yellow instead of its normal color — that's the platform's signal that the photo has annotations on it.
Related: Reports & Sharing
Ready to hand off your findings? Learn how to put your annotated images into a client-ready report and share it with a private link.
Read guide →Was this page helpful?
Thanks for the feedback! It helps us improve the guide.
Still stuck?
We’re happy to help — email us and a real person will get back to you.
contact@nationaldroneservices.net