On this page
When to use this
Use Add External Products when you already have finished, processed deliverables — not raw photos. For example, a colleague hands you a stitched orthophoto, or you processed your flight in another piece of software and just want to view and measure the results inside DataDelivery.
The file types you can import here are:
- An orthophoto — a finished stitched map, as a .tif or .tiff file.
- A DSM (Digital Surface Model: the height of everything, including buildings and trees) — a .tif or .tiff file.
- A DTM (Digital Terrain Model: the bare ground) — a .tif or .tiff file.
- A point cloud — a .las or .laz file.
Note: If you have raw drone photos (not finished products), don't import them here — use Processing Imagery instead, and DataDelivery will stitch them for you. The Upload Files button is also the wrong place for finished .tif/.las files: it strips those out. Always bring finished products in through Add External Products.
Opening the importer
You start the import from the Files tab of your job.
Click Tools. Find the Tools menu on the Files tab and click it to open the dropdown.
Choose Add External Products. The Add External Products window opens.
Importing your files
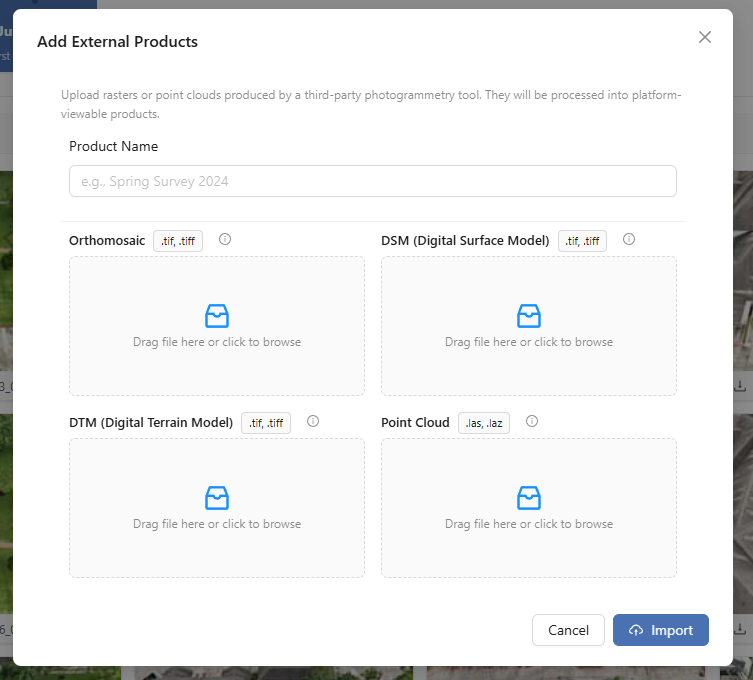
The window gives each product type its own drop slot. You don't need all four — just fill the slots for the files you actually have.
Type a Product Name. This is required, and it has to be unique within the job so you can find these deliverables later.
On recurring jobs, open the correct capture first. If your job has multiple captures (repeat visits to the same site), make sure the capture you want is open before you import.
Drag each file into the matching slot. The slots are laid out in a 2×2 grid. Drop the right file onto the right slot:
- Orthomosaic — your .tif/.tiff orthophoto.
- DSM (Digital Surface Model) — a .tif/.tiff surface-height model.
- DTM (Digital Terrain Model) — a .tif/.tiff bare-ground model.
- Point Cloud — a .las/.laz point cloud.
Fill only the slots you have files for — leave the rest empty.
(Optional) Generate contours from your DTM. If you added a DTM, you can tick Generate contours from DTM and set a Contour interval (metres) (how far apart, in meters, each contour line should be). DataDelivery will build the contour lines for you from that DTM.
Click Import. The window closes right away and your files keep uploading in the background — you can carry on working while they finish.
You'll know it worked when… the window closes after you click Import and an External Product Imports card appears showing your upload in progress.
Tracking the import
After you click Import, an External Product Imports card appears so you can follow along. It moves through these stages:
- awaiting upload — getting ready to send your files.
- queued — waiting in line to be handled.
- validating — checking the files are valid.
- processing — preparing your products for viewing and measuring.
- complete — finished! (Or failed if something went wrong.)
While the files are still uploading, the card shows a Cancel button (the ×) so you can stop the import. Once it's done, that turns into a dismiss button (also the ×) to clear the card away. When the import reaches complete, your imported deliverables appear in the Products folder, right alongside anything DataDelivery processed itself.
You'll know it worked when… the card reads complete and your imported orthophoto, elevation model, or point cloud shows up in the Products folder, ready to open.
Good to know
- DSM/DTM gets linked to your orthophoto. If you import a DSM or DTM in the same batch as an orthophoto, DataDelivery links them together — so features that depend on an elevation model, like stockpile volumes and contour lines, work on that orthophoto.
- Imported point clouds have fewer features. A point cloud brought in this way won't have the photo-annotation features that a point cloud created by DataDelivery's own processing does — because it doesn't carry the original photo information with it.
Related: Measurements & Analysis
Imported a DSM alongside your orthophoto? Use it to measure stockpile volumes and generate contour lines.
Read guide →Was this page helpful?
Thanks for the feedback! It helps us improve the guide.
Still stuck?
We’re happy to help — email us and a real person will get back to you.
contact@nationaldroneservices.net