On this page
What processing does
When you fly a drone over a site, you don't magically end up with one big map — you end up with hundreds of individual, overlapping photos. NDS Processing takes all those overlapping photos from a folder and computer-stitches them together into finished deliverables — that's the magic.
Depending on the options you pick, it can produce:
- An orthophoto — one flat, map-accurate image of your whole site, stitched seamlessly from every photo. This is the main deliverable most people want.
- A point cloud and 3D model — millions of measured points in 3D space that you can spin, fly through, and measure (optional).
- Elevation models — a DSM (Digital Surface Model: the height of everything, including buildings, trees, and stockpiles) and a DTM (Digital Terrain Model: the bare ground with objects removed).
- Contour lines — the curvy lines you see on topographic maps that connect points of equal elevation (optional).
All of this happens on our servers, not on your computer. Stitching is heavy work, so it can take anywhere from many minutes to a few hours depending on how many photos you have and the quality you choose. You don't have to wait around — you can keep working in DataDelivery, switch to another job, or even close the tab. Processing keeps running in the background.
Note: The results are highly accurate and great for visualizing, exploring, and rough measurements, but they are not survey-grade. Don't use them for engineering, legal, or official survey decisions.
Before you start
To process imagery, you need photos already uploaded into a folder. If you haven't done that yet, read Uploading Files & Folders first, then come back here.
A couple of things to check:
- Good overlap. Stitching only works if your photos overlap each other heavily — the drone should have photographed each part of the ground from several angles. Most drone mapping apps do this automatically when you fly a grid pattern.
- Supported photo types. NDS Processing reads standard photo files: JPG and PNG.
Warning: Already-finished files like .tif, .tiff, .las, or .laz are not raw photos — you can't process them again. If you already have a finished orthophoto or point cloud from another tool, bring it in through Add External Products instead.
Starting a processing job
You kick off processing from the Files tab of your job. Here's the full walkthrough.
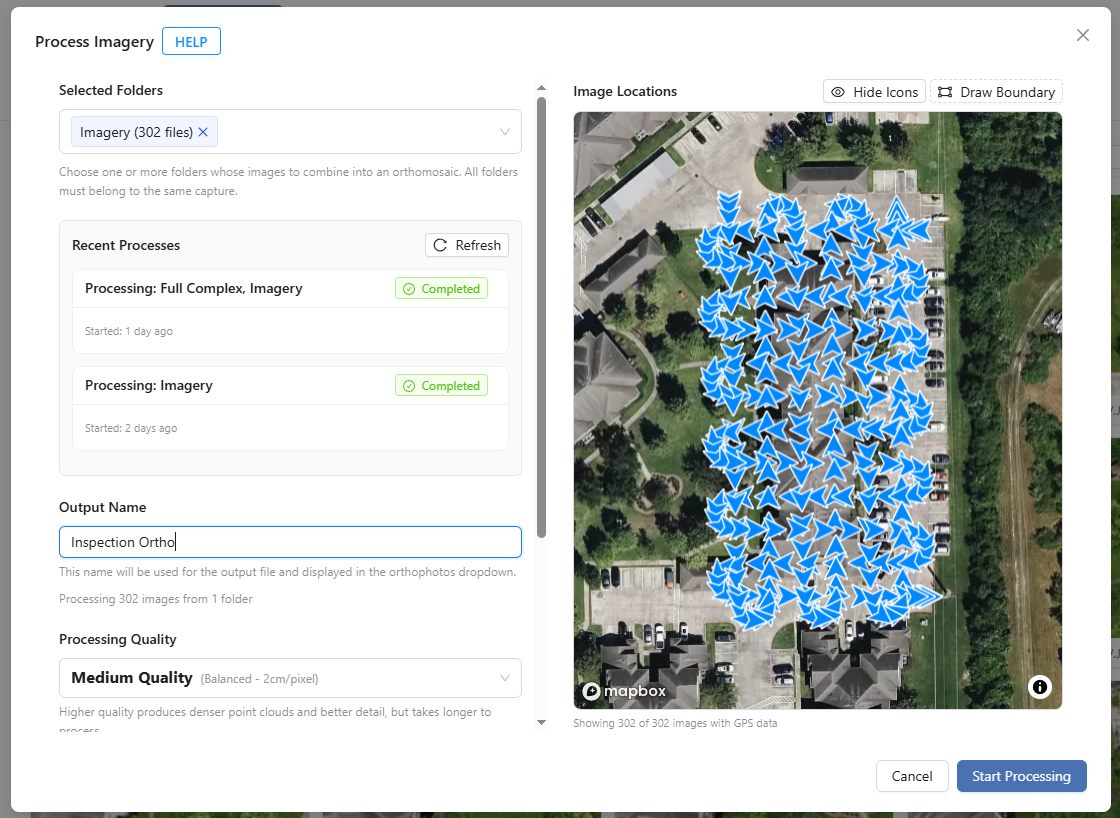
Select the folder you want to process. On the Files tab, click the folder that holds your photos so it's highlighted.
Click Process Imagery. You'll find the button near the top of the Files tab. It stays greyed out until you've selected a folder, so if you can't click it, go back to step 1. The Process Imagery window opens.
Confirm the folders under Selected Folders. Tick one or more folders to combine into a single job. If you flew the site in a few passes and split the photos across folders, you can tick several at once — just make sure they all belong to the same capture (the same site visit).
Give it an Output Name. Type a clear name for the product you're about to make, like Spring Survey 2024. The name has to be unique within the job, so you can tell your deliverables apart later.
Pick a Processing Quality. Choose how sharp and detailed the result should be:
- Low Quality — the fastest option; good for a quick first look.
- Medium Quality — a balance of speed and detail.
- High Quality — the sharpest result (recommended for most final deliverables). It takes the longest.
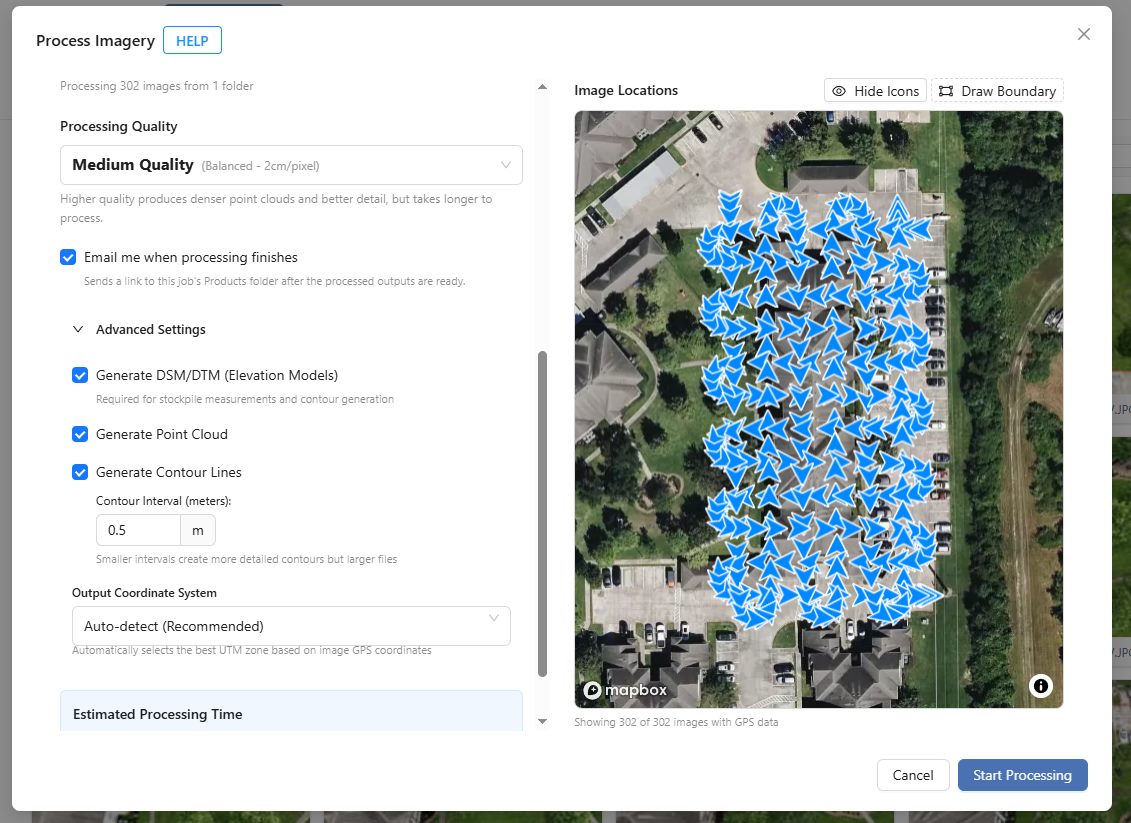
(Optional) Turn on Email me when processing finishes. Because a job can run for a while, tick this and we'll email you the moment it's done.
(Optional) Open Advanced Settings for extra outputs. If you don't touch this, you'll get a standard orthophoto. Expand it to also generate:
- Generate DSM/DTM (Elevation Models) — the surface and bare-ground height models. You'll need these if you want to measure stockpiles or make contour lines later.
- Generate Point Cloud — the 3D point cloud and model.
- Generate Contour Lines — topographic contour lines. When you tick this, set the Contour Interval (meters) (how far apart, in meters, each contour line sits — a smaller number means more, closer lines).
- Output Coordinate System — leave this on Auto-detect (Recommended) unless you have a specific reason to change it.
(Optional) Draw Boundary to limit the area. If you only care about part of the site or want cleaner edges, draw a boundary shape on the map. Processing will focus on just that area, which can speed things up and trim out clutter at the edges.
Click Start Processing. That's it — your job is queued and the work begins.
Tip: If you think you'll ever want stockpile volumes or contour lines for this site, turn on Generate DSM/DTM (Elevation Models) now. Those features need an elevation model, and generating it later means re-running the whole job.
Warning: You can't mix folders from different captures (different site visits) in one job. If you tick folders that don't belong together, you'll see a Mixed Capture Selection message. Process each capture separately.
Watching it run
Once you start, a status card appears showing the live progress of your job, labeled Processing: <folder>. You don't have to do anything — just watch the label move through the stages as the work happens:
- Queued — waiting in line for a free processing slot.
- Downloading Files — gathering your photos.
- Creating Project — setting up the job.
- Uploading to NDS Processing — handing your photos to the processing engine.
- Processing — the actual stitching (this is usually the longest stage).
- Downloading Results — bringing your finished deliverables back.
- Completed — done! (Or Failed if something went wrong — see below.)
When the job reaches Completed, your new deliverables land automatically in a folder called Products inside that capture. That's where every processed output lives.
You'll know it worked when… the status card reaches Completed and a new Products folder (or new files inside it) appears in your capture, holding your orthophoto and any other outputs you chose.
Common problems
If a job won't start or comes back as Failed, it's almost always one of these:
- No Images Found or Invalid Files Detected. Only photos can be processed. Make sure the folder you picked actually contains JPG or PNG images — not finished products like .tif or .las files.
- Mixed Capture Selection. You selected folders from more than one capture. Un-tick the extras and process one capture at a time.
- Failed. Processing couldn't complete. Try again; if it keeps failing, use fewer photos, or make sure your photos overlap each other well — poor overlap is the most common cause of a failed stitch.
What you can do with the results
Once your job finishes, your new deliverables are ready to explore. Here's where to go next, depending on what you want to do:
- View the orthophoto and other outputs. Open them from the Products folder — see Viewing Your Deliverables.
- See your map overlaid on the world. Drop the orthophoto onto the map and compare captures — see Map View.
- Measure stockpiles and make contours. If you generated elevation models, you can measure volumes and create contour lines — see Measurements & Analysis.
- Build a client-ready report. Package your deliverables into a shareable report — see Reports & Sharing.
Related: Viewing Your Deliverables
Learn how to open and explore the orthophoto, point cloud, and the NDS Processing Report once your job is done.
Read guide →Was this page helpful?
Thanks for the feedback! It helps us improve the guide.
Still stuck?
We’re happy to help — email us and a real person will get back to you.
contact@nationaldroneservices.net