On this page
What a job is
In DataDelivery, a job is a project folder for a single site. Think of it the way you’d think of a folder on your computer for one client property — everything related to that location lives inside it.
A single job holds:
- Your photos — the raw drone images you fly and upload.
- Processed products — things the platform builds from those photos, like an orthophoto (a single, flat, map-accurate photo stitched from all your drone images) or a 3D point cloud (a dense cloud of measured 3D points that recreates your site).
- Measurements — distances, areas, and stockpile volumes you take.
- Annotations — notes and markers you pin onto your imagery.
- Reports — the shareable summaries you build to send to a client.
Every job contains one or more captures. A capture is a single dated visit to the site — we’ll cover captures in detail further down this page. For now, just know that a brand-new job starts with one capture, ready for your first set of photos.
Your dashboard: My Personal Jobs
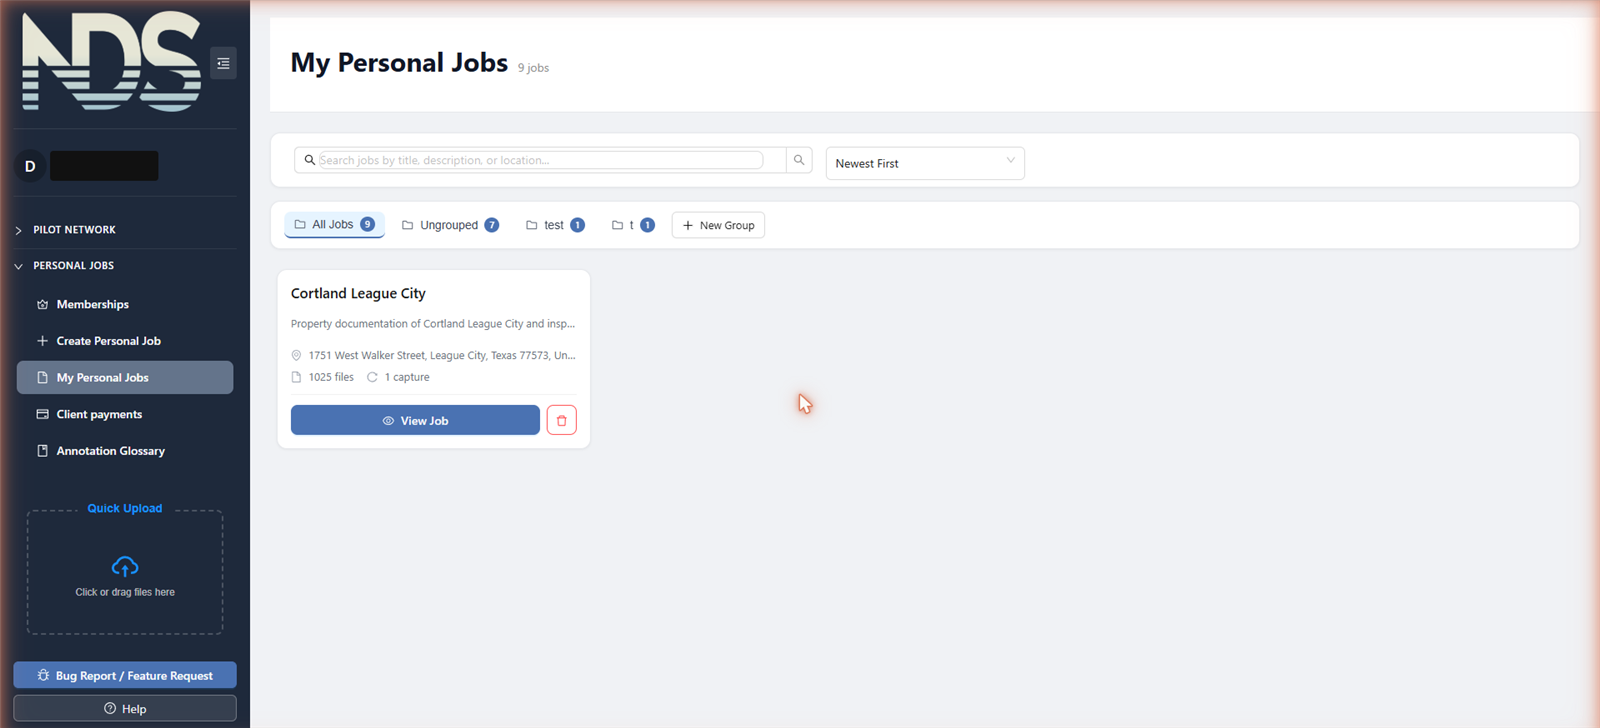
All of your jobs live in one place. In the sidebar on the left, open Personal Jobs and choose My Personal Jobs. This is your home base — you’ll come back here constantly.
At the top you’ll see the heading My Personal Jobs with a count of how many jobs you have. Just below that are two handy controls:
- A search box — type any part of a job’s title to filter the list.
- A Sort by menu — switch between Newest First and Title A-Z.
Each job appears as a card showing its title, description, and address, plus:
- a “N files” count (how many files the job holds),
- a “N captures” count (how many visits it has),
- a View Job button to open it,
- a trash icon to delete the job, and
- a ⋮ (three-dot) menu for more actions, like moving the job to a group.
If you haven’t created any jobs yet, the page shows a friendly empty state with a Create Your First Personal Job button.
Creating a job (step by step)
What this is: a short, three-step wizard that sets up a new project for one site.
What you’ll need first: an active membership. If you don’t have one yet, clicking the button below sends you to the Memberships page to choose a plan first.
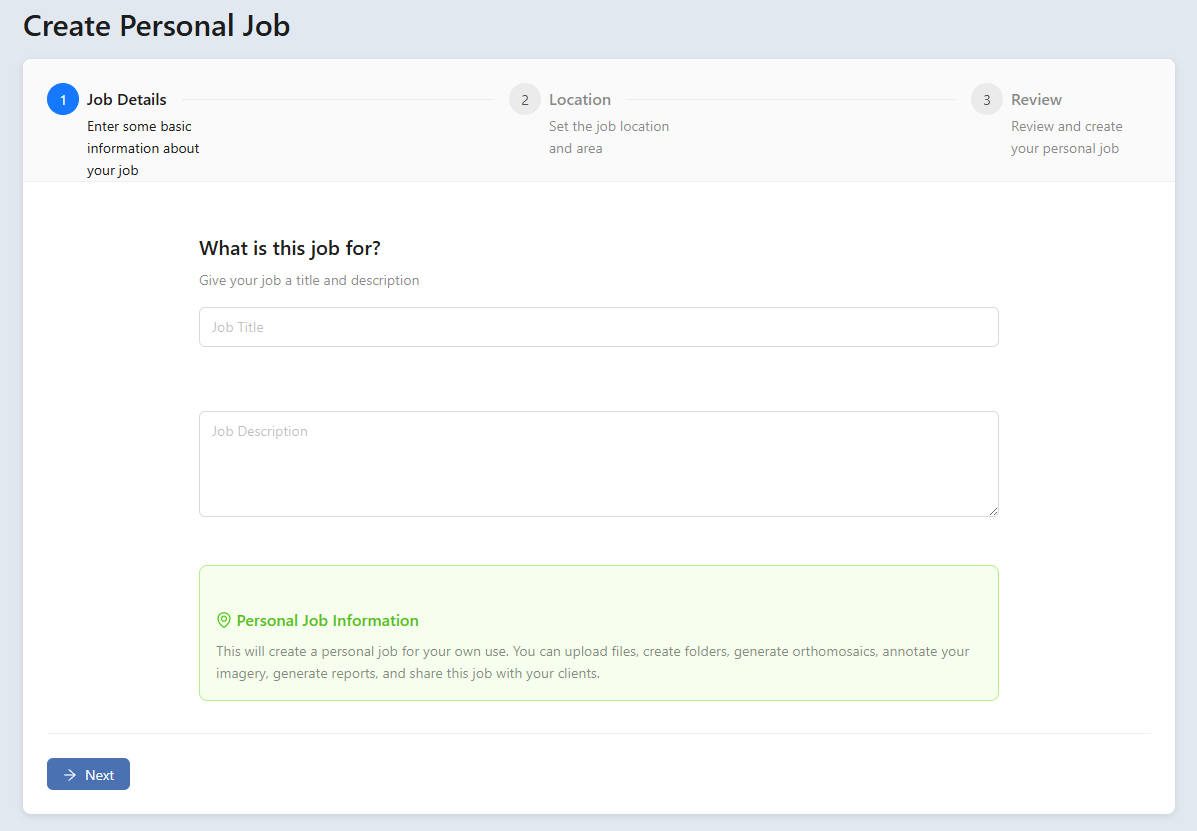
Click Create Personal Job. You’ll find this button on your My Personal Jobs dashboard (or the Create Your First Personal Job button if your list is empty). This opens a wizard with three steps: Job Details, Location, and Review.
Step 1 — Job Details. Type a Job Title (for example, the property name or address) and a Job Description. Both are required. When they’re filled in, click Next.
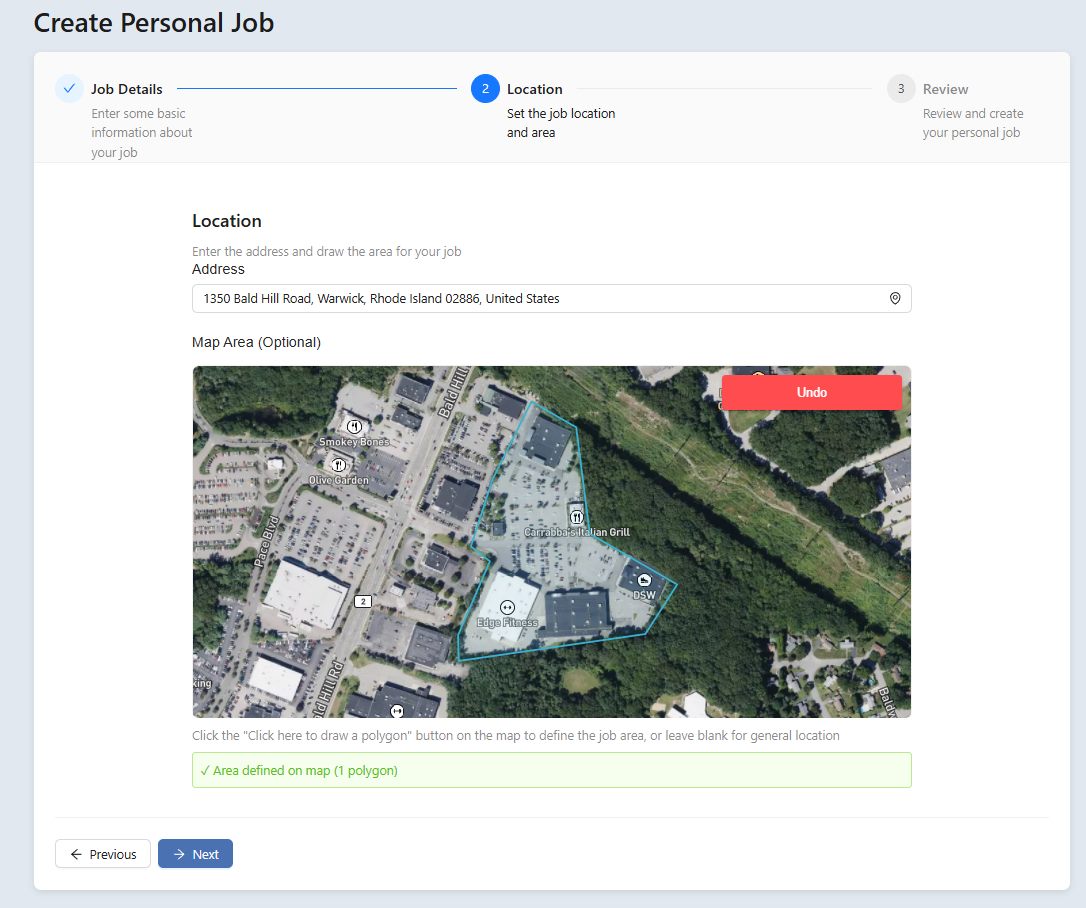
Step 2 — Location. Start typing the site Address, then pick the matching suggestion from the list that drops down (a valid address is required). Optionally, you can outline the site under Map Area: use the draw button on the map to trace the boundary of your site, or just leave it blank — you can always add it later. Click Next when you’re done.
Step 3 — Review. Double-check your title, description, and address. If everything looks right, click Create Personal Job. The platform builds the job and drops you right into it, ready for photos.
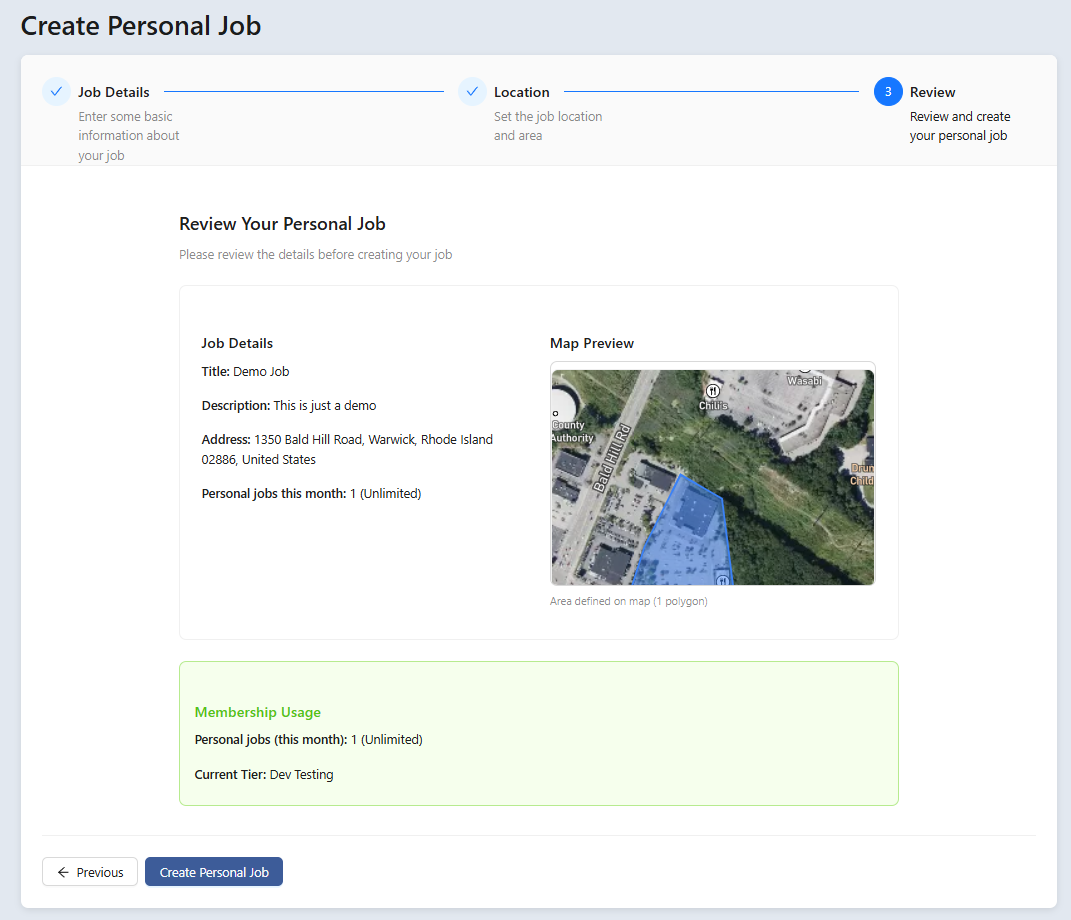
You’ll know it worked when… the wizard closes and you land on your new job’s page, with its title at the top and an empty Files tab waiting for your first upload.
Note: your plan includes a set number of jobs per month. If you’ve hit that limit, the platform will let you know and offer a View Membership Plans link so you can upgrade. See Plans, Storage & Billing for how each tier’s limits work.
Organizing jobs into groups
Once you have more than a handful of jobs, groups keep them tidy — like labeled drawers. Groups are entirely optional, but they make a long job list much easier to scan.
Across the top of your dashboard is the groups bar. It always includes All Jobs and Ungrouped, followed by any custom groups you’ve made, and a New Group button on the end.
Create a group
Click New Group. It’s at the end of the groups bar.
Name the group and confirm. Type a name (for example, a client or region), then click Create Group. Your new group appears in the bar.
Move a job into a group
There are two easy ways:
- Drag and drop — grab a job card and drag it onto a group name in the bar.
- Use the menu — on the job card, click the ⋮ (three-dot) menu and choose Move to Group.
To see only the jobs in a group, click that group in the bar. Click All Jobs to go back to the full list, or Ungrouped to see jobs that aren’t in any group yet.

Inside a job: the tabs
When you open a job (by clicking View Job), the page is organized into tabs. Here’s what each one is for:
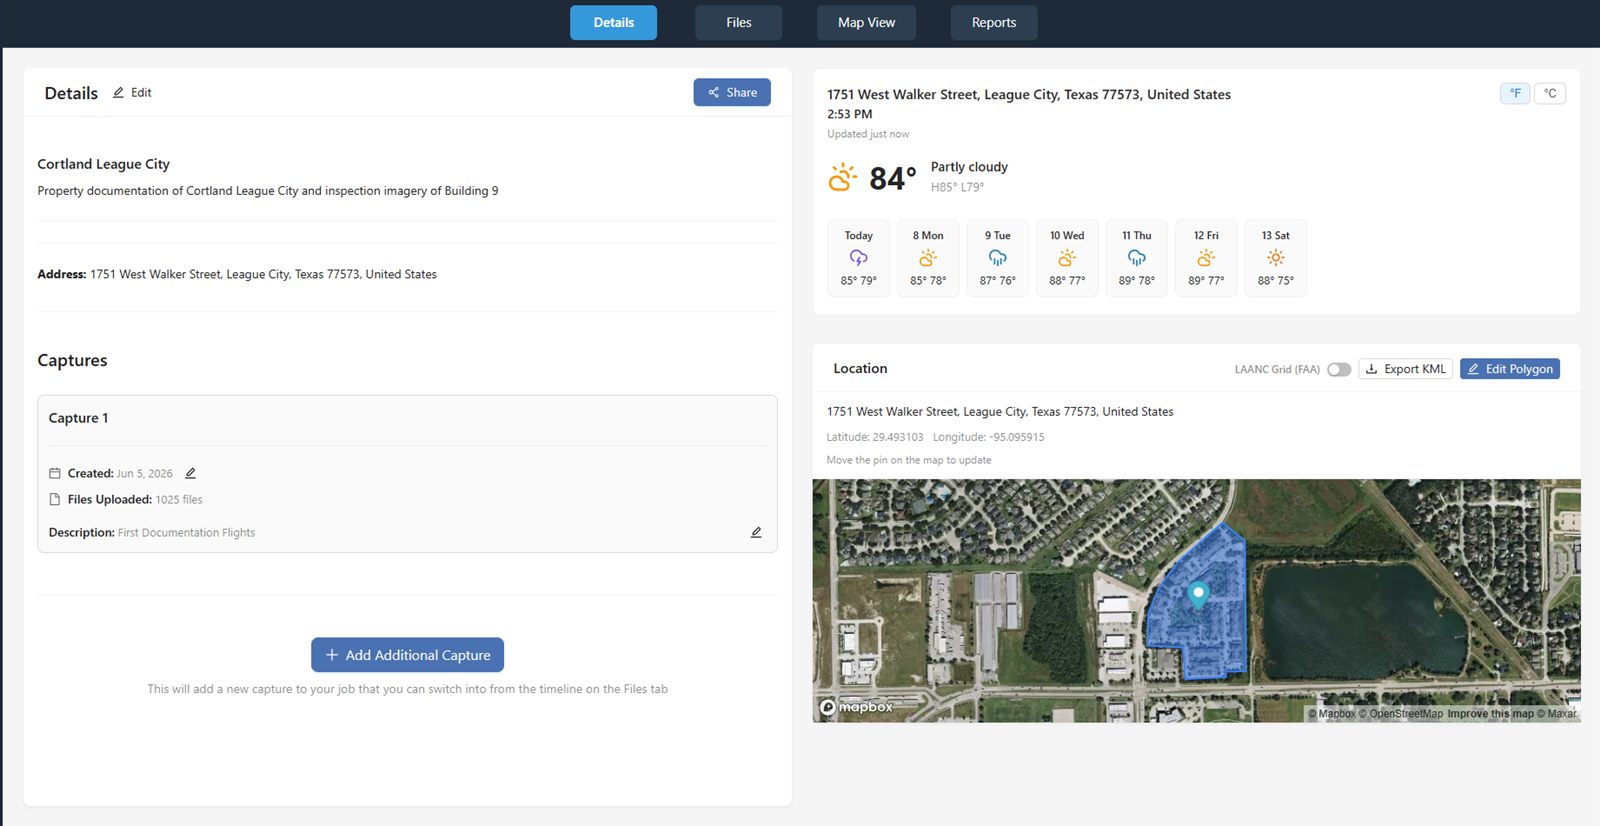
- Details — the job’s title, description, and address; its captures; sharing options; and a weather widget with a location map.
- Files — where you upload and manage your files, run processing, and reach the extra tools.
- Map View — an interactive satellite map where you can overlay your orthophotos and imagery, take measurements, and inspect imagery.
- Reports — build a polished, shareable report from your data.
Note: the file-viewer tabs — GeoTIFF, Point Cloud, Image, and Video — don’t appear until you actually open a file of that type from the Files tab. If you don’t see them yet, that’s normal: open a file first and the matching viewer tab appears.

Related: Uploading Files & Folders
Once your job exists, the next step is getting your drone photos in.
Read guide →Related: Map View
See how the Map View tab overlays your orthophotos on an interactive map.
Read guide →Related: Reports & Sharing
Build a client-ready report from the Reports tab and share it with a link.
Read guide →Captures: one site, multiple visits
A capture is one dated visit to your site — a single flight on a particular day, with its own folders and its own processed products. This is the key idea that makes DataDelivery great for tracking a place as it changes.
Every job automatically starts with one capture (Capture 1). You can stop there if you only visit once. But if you fly the same site again next month — to track construction progress, a growing stockpile, or seasonal change — you add another capture. Each capture keeps its own photos and products separate, so you can compare visits cleanly.
On the Details tab, each capture appears as a card showing its date, file count, and description.
Add another capture
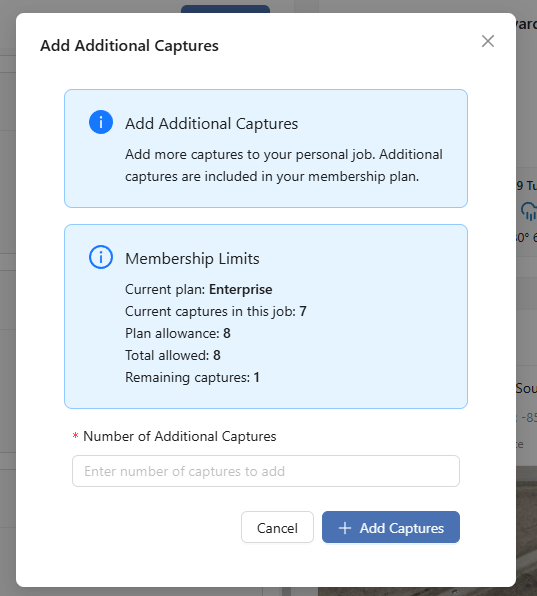
Click Add Additional Capture. You’ll find it with the capture cards on the Details tab.
Choose how many to add. The Add Additional Captures window opens, showing your plan’s capture allowance and a number field. Captures are included in your subscription up to that limit; beyond it, you can purchase more. Confirm to add them.
To work in a particular capture on the Files or Map View tabs, use the Capture Timeline bar to switch between captures. Whatever capture is selected there is the one you’re actively viewing.

Tip: use one job per site, and add a new capture each time you revisit it. That keeps a clean timeline for the same location instead of scattering visits across separate jobs.
Deleting a job
If you no longer need a job, you can delete it from your dashboard. Because this is permanent, the platform asks you to confirm twice.
Click the trash icon on the job card. You’ll find it on the job’s card in your My Personal Jobs list.
Confirm in the Final Confirmation Required window. Read the warning carefully, then click Yes, I'm Absolutely Sure to delete the job.
Warning: deleting a job is permanent and removes all of that job’s data — every capture, every uploaded photo, every processed product, every measurement, annotation, and report. This cannot be undone, so make sure you’ve downloaded anything you want to keep first.
Was this page helpful?
Thanks for the feedback! It helps us improve the guide.
Still stuck?
We’re happy to help — email us and a real person will get back to you.
contact@nationaldroneservices.net